How to Make Cinemagraphs in Blender
Almost a year ago I discovered the Reddit community r/cinemagraphs. It’s a place for sharing a style of art I hadn’t heard of before. Cinemagraphs like the one above are a hybrid between a photo and a video. Most of what you see is static, but certain parts of the scene move in a looped gif. The effect is calming and can even be beautiful. Fall winds and loading cement are two of my favorites.
I wanted to try making one but hit a roadblock right away: Most artists who make cinemagraphs, and the only online tutorials I could find, use Photoshop or After Effects. I don’t have a Creative Cloud subscription and prefer to support open source tools when I can. I played around with a few alternatives and it was clear that Blender could do it, but there wasn’t good documentation on how.
At least until today. This summer I visited Korea and saw so many potential cinemagraphs, from steam rising over bbq to the rotating fan in my hostel lobby, that I decided to record those moments and figure it out later. The process can be broken down into a series of tasks that Blender does very well, and each of those tasks into steps. Let’s walk through them one-by-one.
Record a Video
Aim for ten seconds. Try to keep steady: The more your camera moves, the harder the footage will be to edit. I shot the video below standing on a bluff. It goes without saying that you’ll get better results with a tripod or gimbal.
Open the Video and Cut It
Start Blender and select File > New > VFX. You should see a set of workspace tabs at the top of the window with names like Motion Tracking and Compositing. Your Motion Tracking workspace should be open. If not, select it. The window will be divided into distinct areas with different functions. You won’t need the top two and can hide those areas by right-clicking within their header bars then selecting Close Area.
Click on Open and find your video. Use the playback buttons and slider at the bottom to scrub through it a couple times. Pay attention to how the video shifts over time and look for the most stable 3-5 second section. Use the keyframe markers to mark frames that you consider for your start and end points. When you’ve decided which part to use, adjust the Start and End values in the bottom right corner.
If it takes Blender a while to update the display as you skip around, find the Clip menu and select Set Scene Frames and Prefetch. This will load everything at once and save you time over the course of the project. If the video’s colors look off, you can swap the color space under Footage Settings.
Stabilize the Footage
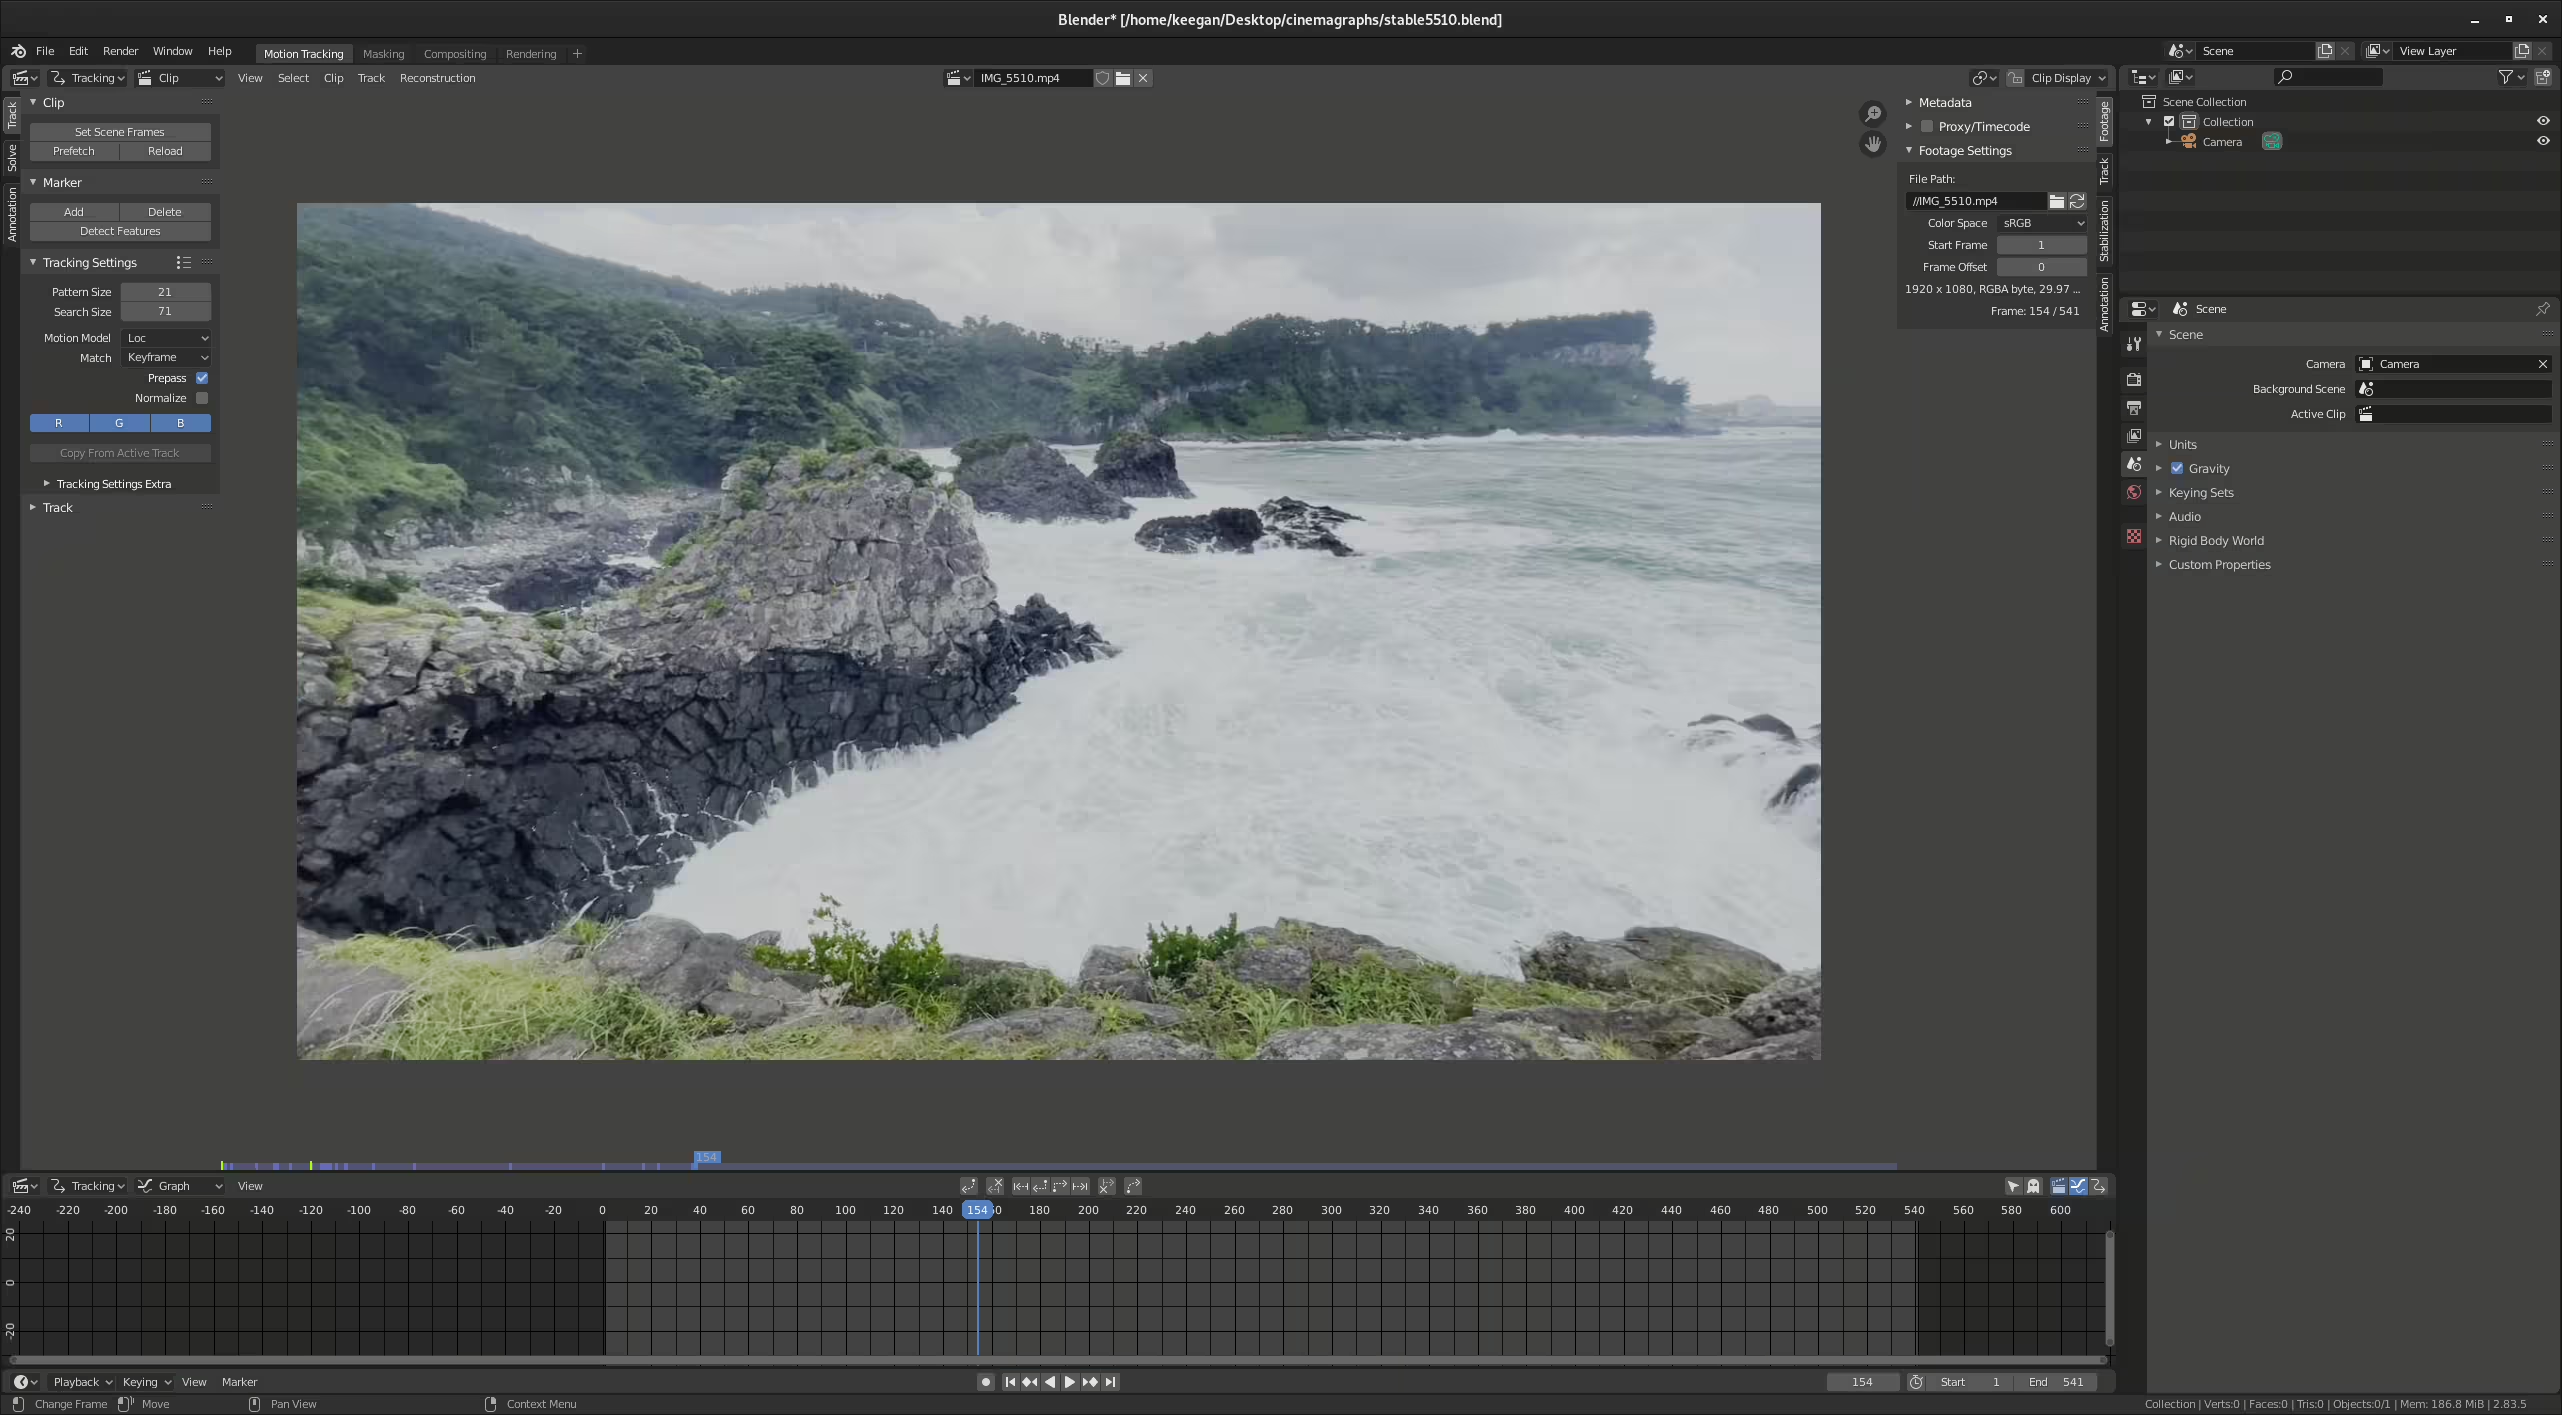
Confirm you have the Motion Tracking workspace open. Scrub to the first frame of your video segment and look around the image for two or three points of high contrast that are far apart from each other. Press Ctrl+Click over each one to drop a motion tracker there, then press Ctrl+t to track forward to the end of the clip (Control+T to track backwards). You’ll know the spot you chose works if the tracker stays over it for the full clip. Repeat this process with the other point(s).
Open the Stabilization tab and check the box for 2D Stabilization. Check the boxes for Rotation and Scale then click on the plus signs to add Tracks for Location and Tracks for Rotation/Scale. Start by adding all trackers to both lists then tweak what goes where. To see the stabilized footage, open the Clip Display dropdown and select Show Stable. You may not need Scale at all – play around to see what you like best.
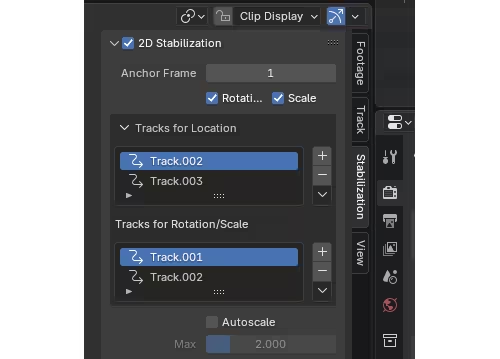
If there’s still a noticeable shift at some point in the playback, you may want to cut the video shorter to avoid that moment. Select Autoscale to see what the final product looks like. This crops the frames to show the stabilized footage without its swaying borders.
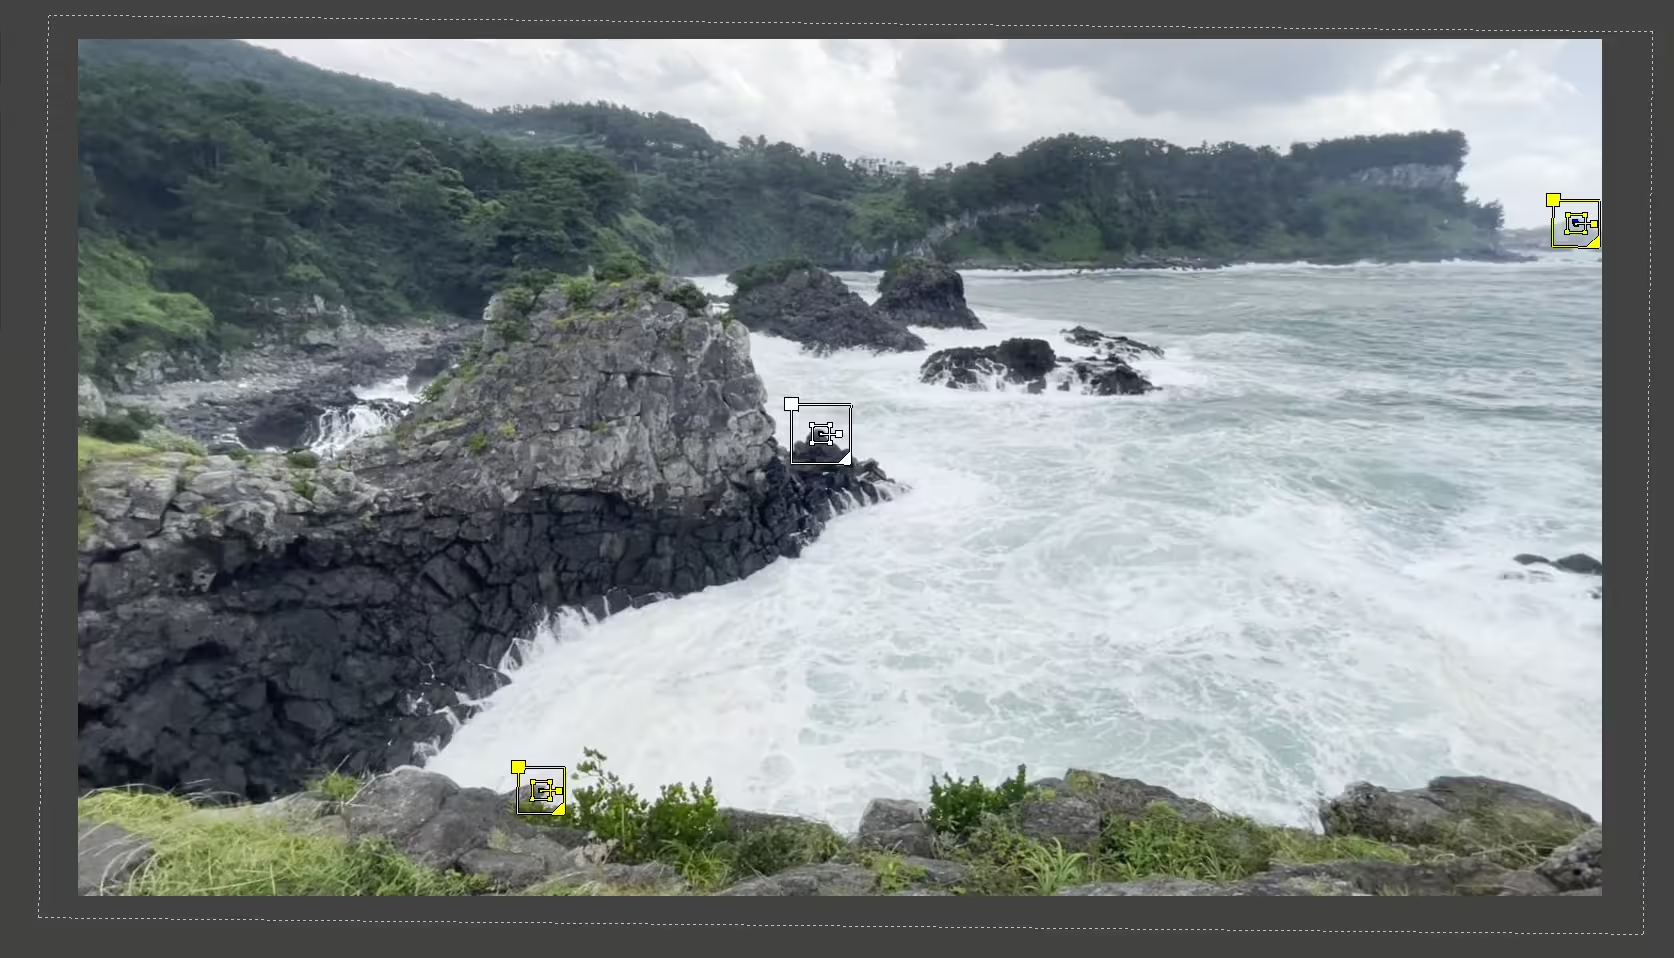
You should also play around with the Anchor Frame. Blender adjusts the other frames around that one, so it makes sense to move the anchor towards the middle of your clip in cases where your footage drifts slightly in the same direction throughout.
Next, open the Compositing workspace up top and select Use Nodes. This is where Blender stitches the pieces together. Delete the Render Layers node. Press Shift-A repeatedly to add Movie Clip, Stabilize 2D, and Viewer nodes to the compositor. Connect them together (photo below).
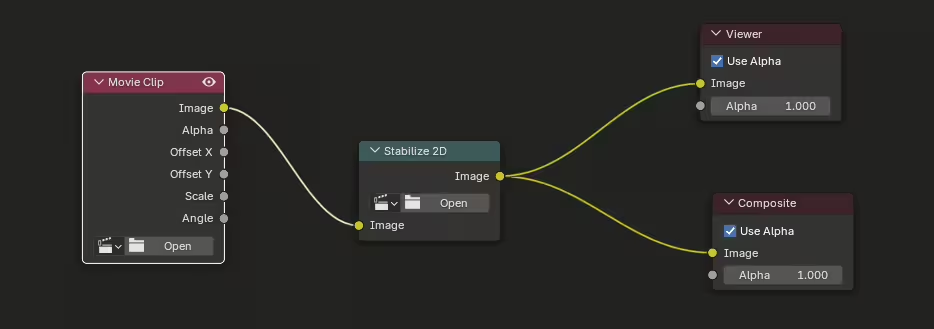
Click on the clapperboard icons inside the Movie Clip and Stabilize 2D noses and choose your clip from the dropdown. Your work in progress will appear in the background. If not, select Backdrop on the top right. Press v to zoom out.
Choose a Still Frame
Scrub through the clip until you find the right image for the static half of your cinemagraph. I looked for one that showed as much rock as possible and minimized splashes in the background. A permanent splash would look out of place. Press F12 to render the image then save it with Image > Save As. Having set up the Node Editor, the rendered image will be modified from the motion tracking. If you re-do that step later, you’ll want to do this again too.
 My still frame
Create a Mask
Switch to the Masking workspace (or add it by selecting + > VFX > Masking). Select the clapperboard to choose your video then select New to create a new mask. Give it a name. If you end up using multiple masks, a name makes it easier to tell the difference. Press Control+Click to add points to the mask. Each point will connect to the previous one. Continue dropping points in a clockwise circle to draw a border around the dynamic part of your scene. The line should and fully divide the scene in two.
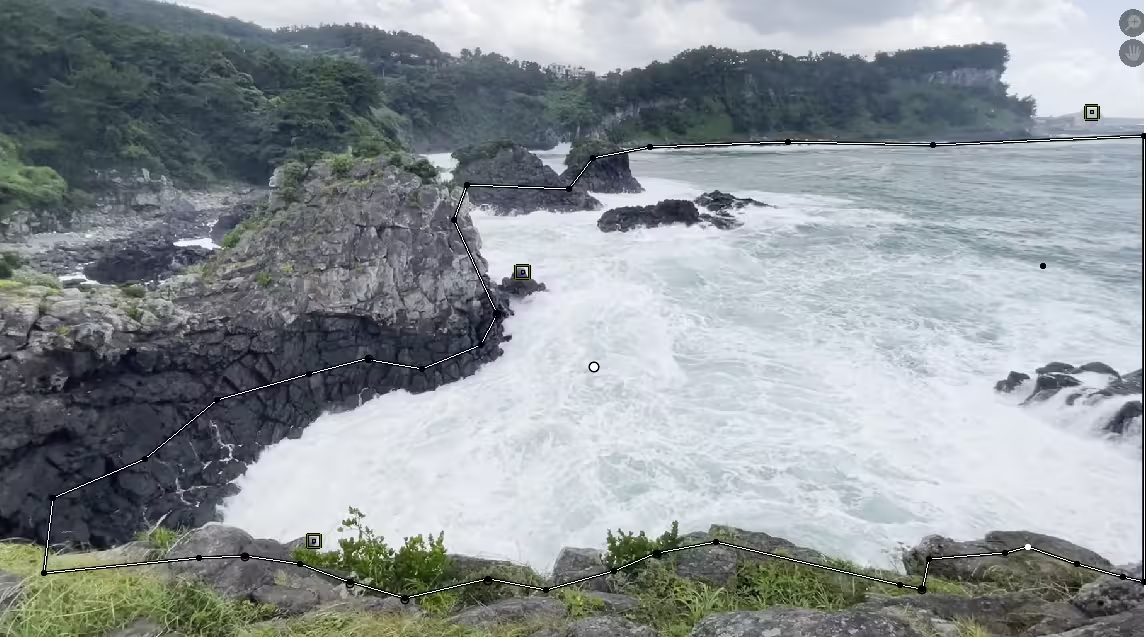
I wasn’t sure whether or not to include those plants swaying in the foreground. Cinemagraphs favor isolation and ideally focus on just one thing, but after trying both options I decided to keep it.
Return to the Node Editor and add three new nodes: Input > Image, Input > Mask, and Color > Mix. Choose your still frame inside the Image node (in my case, 5510_Static). If you changed the video’s color space earlier, make that change in the image node too. Connect the nodes as in the picture below. Your stabilized footage, mask, and still frame feed the Mix node, which merges them all together.
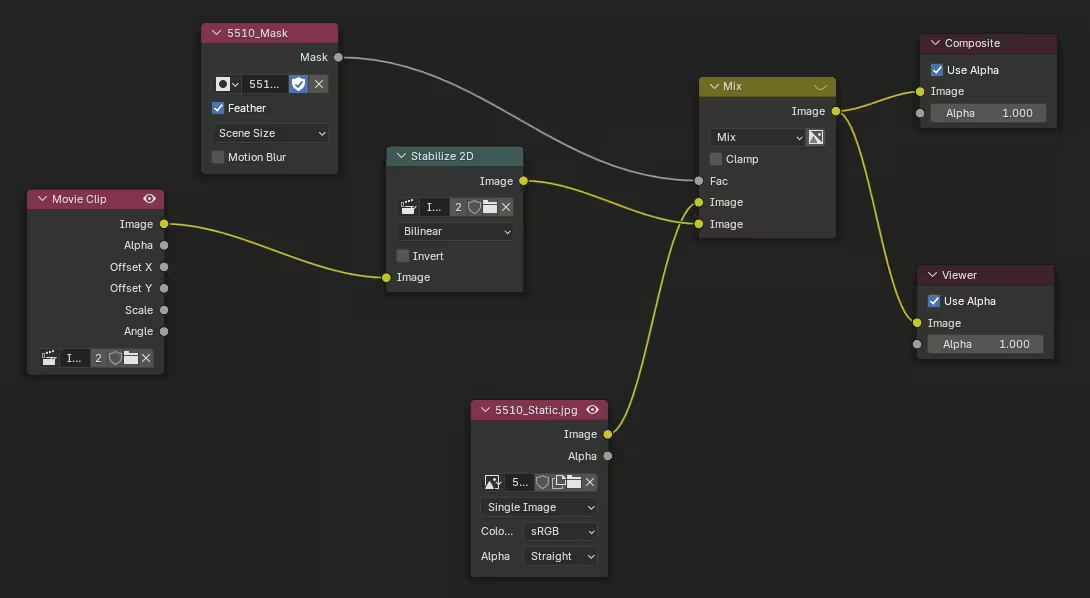
Now you can preview the full effect! Scrub through the scene and watch how the rendered image changes (make sure Backdrop is selected in the render pane). Look for areas where the mask isn’t working and move those points to adjust. This is not an exact science – I get the best results by choosing a border just outside the area I want to animate.
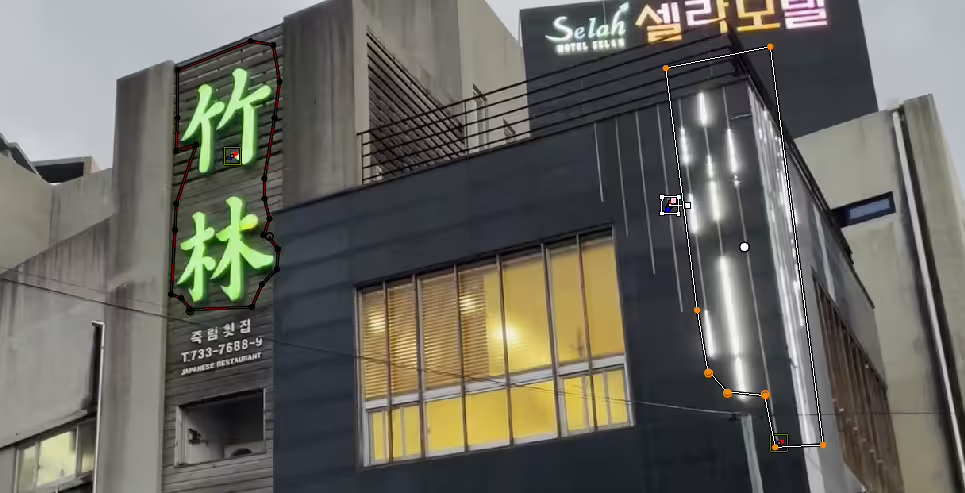
If the location of a mask needs to change over time, you can anchor it to the movement of a motion tracker you made earlier. The white dot in the center of a mask is called a control point. Click on the control point, press Shift-Click over the tracker, then press Ctrl+p. This parents the tracker to the mask so that the mask’s placement changes accordingly.
In the screenshot below, both masks are anchored to trackers.
Render the Scene
Once you’re happy with your mask, open the Compositing workspace (or use the Node Editor inside the Masking workspace) to build the scene.
Find the Output Properties tab in the right hand Scene menu. Expand Output and choose a folder for the rendered animation. Make sure Frame Range matches the segment you want to render. Choose JPEG from the File Format dropdown then expand Post Processing. Uncheck the box for Sequencer but leave the Compositing box checked.
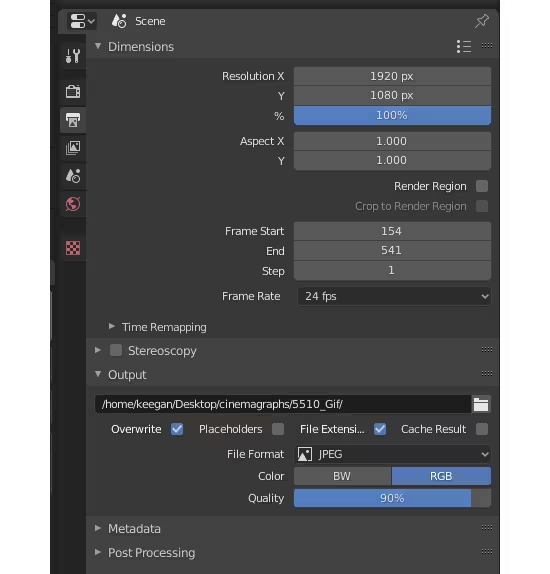
Select Render > Render animation from the top menu. Blender will render the animation as a sequence of 1080p JPEG images inside the folder you chose. Blender cannot make gifs directly, but you can press the images into a gif with ffmpeg.
First create a pallette:
ffmpeg -start_number {start frame} -i %4d.jpg \
-v warning -vf "fps=15,scale=720:-1:flags=lanczos,palettegen" \
-y palette.png
Then pass ffmpeg the palette and image sequence to create a gif.
ffmpeg -start_number {start frame} -i %4d.jpg \
-i palette.png -v warning \
-lavfi "fps=15,scale=720:-1:flags=lanczos [x]; [x][1:v] paletteuse" \
-y {gif name}.gif
Improve the Loop
No matter how steadily you held the camera, without the right equipment you will notice a small jump each time your gif resets. Even after stabilization, camera drift means the first and last frame will have been shot from slightly different perspectives. To minimize this we can blend the start and finish together.
Create another workspace with + > Video Editing > Video Editing. In the bottom area, select Add > Image/Sequence and open the folder with your images inside. Add about half the frames by clicking on the first one, pressing and holding-down Shift, scrolling half way down, then clicking on another frame. Remember which one!
Add the remaining frames by clicking on the next image in the sequence then scrolling down to the end. The image sequences will show up as two strips in the Sequencer area. You can click and drag to move them. Orient the two so that the second half comes before the first half with a small amount of overlap. We’ve effectively moved the end of the gif to the middle.

Now we can smooth over the break. At the start of the overlap, change the top clip’s opacity from 1.0 to 0 then press i. Scrub to the end of the overlap, change the opacity back to 1.0, then press the i key a second time. The top clip will fade-in over the bottom clip. Update the Start and End values on the bottom right now that the rendering range is a bit shorter.
Before you render the animation again, go back to the Scene menu and expand Output. Choose a new output folder so that Blender doesn’t overwrite the old sequence. You’ll want to keep it in case you re-do this step in the future. Scroll down, expand Post Processing and check Sequencer. Now Compositing and Sequencer should both be checked.
Render the animation then convert the new sequence to a gif.
ffmpeg -start_number {new start frame} -i %4d.jpg \
-i palette.png -v warning \
-lavfi "fps=15,scale=720:-1:flags=lanczos [x]; [x][1:v] paletteuse" \
-y {cinemagraph name}.gif
Congrats! You’ve just made a cinemagraph in Blender. To share it, upload the gif to a publishing service like Giphy. This album has most of my work in it.